Millwork 101: The Trim Details That Make a Remodel Look High-End
You’ll get a high-end remodel by starting with a tight trim system: set the baseboard width first, then size the casing and crown to match your ceiling height and maintain a clear geometry. Keep reveals crisp and consistent, miters dead-on, and outside corners returned clean. Use stable 5/8-inch stock and coordinate the base projection with the casing thickness so doorways feel solid. When you add panels or built-ins, align the datum lines and scribe to ensure zero gaps. There’s more to refine next.
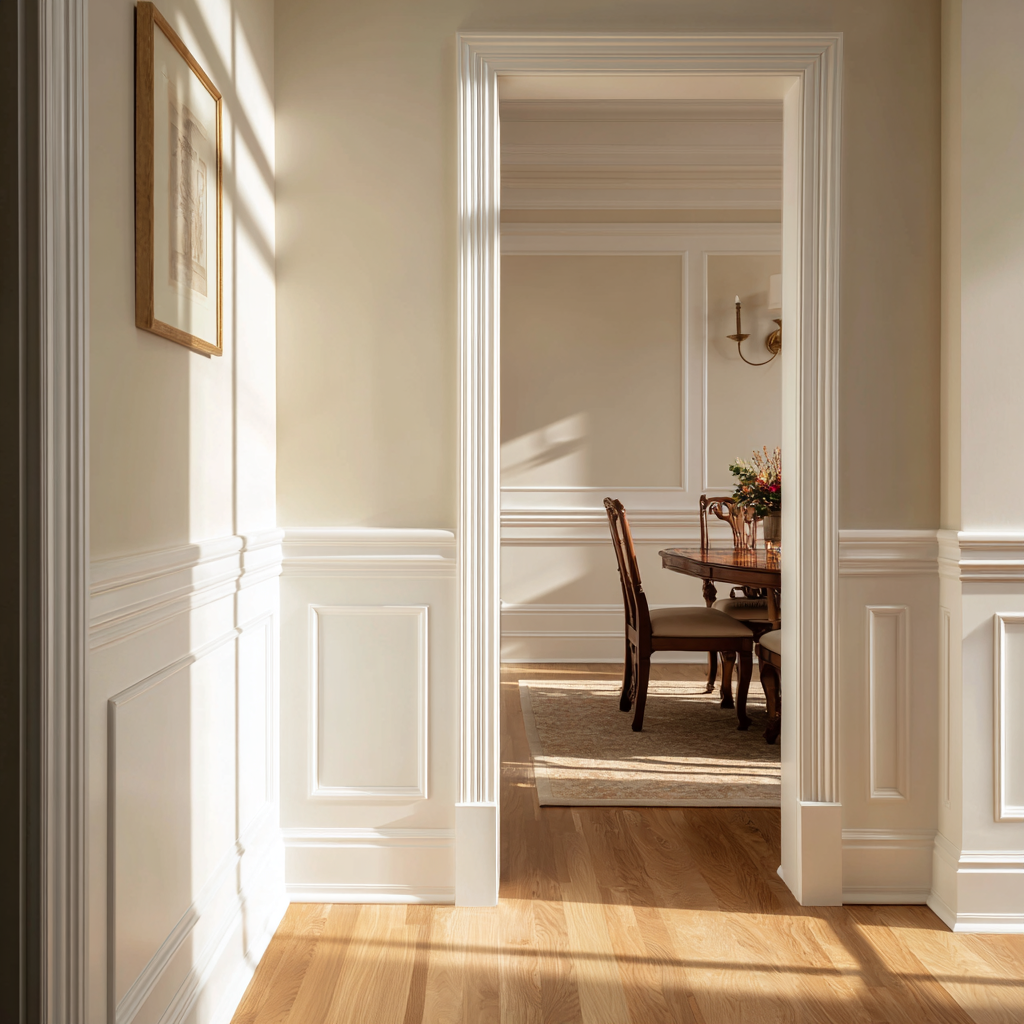
Millwork Basics: Baseboards, Casing, and Crown
Where do you start if you want your remodel to read as “finished” the moment you walk in? You start with a tight trim system: baseboards, casing, and crown that share a consistent design logic. Set baseboard widths first; they anchor every wall plane and dictate how robust everything else should feel. Keep reveals crisp, miters dead-on, and returns clean at outside corners. At doors and windows, spec casing with sharp inside corners, uniform shadow lines, and backband only if you’re intentionally adding depth. Then choose crown profiles that echo the same geometry—flat, cove, or stepped—so transitions look engineered, not improvised. Pre-plan joint locations, cope inside corners, and prioritize straight stock. Your paint and caulk can’t fix a sloppy layout.
Millwork Scale: What Works for Your Ceiling Height
You’ll get the most high-end result when your trim scale matches your ceiling height, not your room size. Use the ceiling height to set your proportions, then choose a crown size with enough projection and drop to read cleanly, and a baseboard width that visually anchors the wall without overpowering it. Next, you’ll map 8-, 9-, and 10-foot ceilings to a practical crown molding size guide and baseboard width recommendations.
Proportions By Ceiling Height
How tall are your ceilings, really—8 feet, 9, 10, or more? Your trim has to read correctly at eye level and from the entry, so scale it to the room’s vertical volume. Use Proportions guidance to prevent squat baseboards on tall walls or overpowering casings on low ones. Watch Ceiling interactions: taller planes amplify shadow lines, while lower ceilings compress them, so profiles must stay crisp, not busy.
- 8-foot ceilings:** keep casing and base lean; prioritize clean reveals and tight radii.
- 9–10 feet:** step up thickness and projection; add deliberate backband or layered stops.
- 10+ feet:** widen the visual frame around openings; use deeper offsets to hold detail at distance.
Mock up sections on-site, then adjust by 1/8-inch increments.
Crown Molding Size Guide
Crown molding reads right only when its drop, projection, and profile complexity match the ceiling height and the room’s viewing distance. For 8-foot ceilings, spec 2 1/2–3 1/2 inches of drop with a crisp, low-relief profile; anything larger crowds the plane. At 9 feet, move to 3 1/2–4 1/2 inches, keeping projection roughly equal to drop for balanced shadow lines. At 10–12 feet, 5–7 inches, the crown molding holds its own; add a secondary bead or cove only if your wall surfaces are dead flat. In open plans, upsize one step to read across longer sightlines. Always mock up in foam and validate with a raking light.
Baseboard Width Recommendations
Where baseboards look “right” comes down to scale: their height and profile have to counterbalance the wall plane without crowding the room. Treat baseboard width as a proportional tool: taller ceilings need more visual mass at the floor to ground the elevation. For 8-foot ceilings, you’ll usually land at 4–5 inches; at 9 feet, 5–7 inches reads intentional; at 10–12 feet, 7–10 inches can look custom when the profile stays crisp. Keep the projection (baseboard width) coordinated with casing thickness so the base doesn’t feel flimsy or overbuilt at doorways.
Dial in these checkpoints:
- Match the base cap shadowline to your casing reveal
- Increase height before adding ornament
- Use 5/8-inch stock for stability
Millwork Profiles: How to Match Trim Styles
Sometimes the difference between “standard” and “custom” comes down to profile— the exact curves, steps, and shadow lines milled into your casing, baseboards, and crowns. To get trim matching right, you’ll start by cataloging your existing millwork profiles: snap square-on photos, measure each reveal, and note how many beads, coves, or fillets appear. Then decide whether you’re continuing a historical language or engineering a cleaner, more contemporary read. Keep one dominant geometry across the room—either flat/stepped, or curvy/ogee—and let secondary details stay quieter. At transitions, align profile “datums,” so shadow lines wrap corners and door heads without jumping. If you must mix profiles, match the depth first; the eye forgives shape sooner than misaligned relief.
Millwork Upgrades: Bigger Baseboards and Wider Casings
A few well-chosen inches can make your trim read as intentional rather than builder-basic: bump baseboards to 5–7 inches and widen door/window casings to 3–5 inches to give openings real visual weight and cleaner shadow lines. Scale them to ceiling height: 8-foot rooms like 5–6 inches; 9–10-foot rooms can carry 7 inches without feeling top-heavy. Prioritize crisp reveals and consistent offsets so every intersection lands clean.
- Lock in material selection early: MDF for ultra-smooth paint, poplar for durability, or hardwood where dents show.
- Control finish textures with a spray-grade primer, then sand between coats to keep edges sharp.
- Use plinth blocks or backband only if you can maintain straight lines and uniform miters.
Crown and Panel Millwork: Add Depth to Walls
Crown, picture rail, and wall panels function like the room’s framing—they set proportions, deepen shadow lines, and make flat drywall read as custom. Start by mapping your datum lines: ceiling height, door head height, and an intentional rail elevation. Keep reveals consistent, and let transitions land on studs for fasteners that won’t telegraph.
For the crown, spec a profile that matches your casing thickness, then tune crown accents with a small backband or a clean shadow strip for a crisp, modern step. For panels, prioritize panel depth: 3/8-inch applied molding reads subtle; 3/4-inch creates architectural relief. Align panel bays to window centers, then use tight miters, coped inside corners, and caulk only where movement demands it.
Built-In Millwork: Where Custom Work Pays Off
When you invest in built-in millwork, you convert dead space into bespoke storage that’s sized to the inch and planned around how you actually live. You also sharpen the architecture—fireplace surrounds, window seats, and bookcases read as intentional features when reveals, face frames, and proportions stay consistent. Get the payoff by integrating the details: align trim lines, match profiles, and scribe tight to floors and walls so every joint looks seamless.
Bespoke Storage Solutions
Where does custom millwork earn its keep fastest? In bespoke storage that makes dead space perform. You’ll get cleaner sightlines and faster routines when every shelf, divider, and pullout is sized to your exact inventory, not a generic catalog. Specify tight reveals, durable edge-banding, and hardware rated for daily cycles so it feels engineered, not improvised. Use custom organizers to control chaos inside cabinets, closets, mudrooms, and pantries without sacrificing square footage.
- Full-extension drawers with adjustable partitions for flexible categories
- Vertical tray dividers and tilt-out bins that prevent stacking damage
- Integrated charging cubbies with cord grommets and ventilated back panels
Ask for mockups, then iterate in millimeters. You’ll land on storage that’s quiet, efficient, and unmistakably high-end.
Architectural Feature Enhancements
Why do built-ins read as “architectural” instead of “added on”? Because you design them as massing rather than furniture. You establish datum lines—base, rail, and header heights—then hold them across the room so the eye reads intention. You size carcasses to framing modules, align stiles with door and window casing rhythms, and keep reveals consistent to the 1/16-inch.
Custom work pays off when a built-in becomes a feature: a fireplace surround with book towers, a banquette that turns a corner into destination, or a media wall that hides equipment yet celebrates proportion. Use creative contrast through finish or species shifts, but keep profiles disciplined. Make material sourcing strategic: stable cores, veneer sequences, and durable edges that machine cleanly and age well.
Seamless Integrated Detailing
How do the best built-ins look like they’ve always belonged? You treat them like architecture, not furniture, and you engineer the transition. With integrated millwork, you align cabinet faces to casing reveals, carry base and crown profiles through, and hide fasteners so shadow lines stay intentional. You’ll get seamless detailing when every joint lands on a planned datum and tolerances are measured, not guessed.
- Scribe panels to walls and floors, then plane for a zero-gap fit
- Match reveals: 1/8-inch returns, consistent setbacks, and centered rails
- Integrate lighting, outlets, and HVAC grilles behind aligned trims
Spec first, build second: map stud locations, door swings, and service runs. When you coordinate early, your custom work pays off and reads effortlessly high-end.
Conclusion
When you choose millwork with intention, you turn a plain remodel into a tailored suit. You let baseboards anchor the room like a clean plinth, casings frame views like gallery mats, and crown pulls the ceiling into a crisp horizon line. You scale profiles to your height, match eras with disciplined restraint, and spend on built-ins where craftsmanship shows. In the end, every joint lands tight, every reveal reads sharp, and the whole house feels finished.
Frequently Asked Questions
1. What exactly is millwork, and how does it differ from casework?
While both involve wood elements in your home, they serve very different design functions:
- Millwork: Refers to custom-manufactured wood architectural details produced in a mill and installed by a finish carpenter. This includes crown molding, baseboards, door casing, wainscoting, mantels, and ceiling beams. It is highly tailored and built to fit the exact contours of your room.
- Casework: Refers to mass-produced, modular box goods. Think of standard, off-the-shelf kitchen cabinets, stock bookshelves, or storage boxes. It is called “casework” because it literally involves making boxes (or cases) that are fit together on-site.
2. Why is millwork considered the secret to a “high-end” home remodel?
Standard modern drywall leaves a room looking like a sterile, flat box. Custom millwork introduces depth, shadow lines, and architectural scale. It bridges the gap between different surfaces—like where a wall meets a ceiling or a floor—hiding imperfections and drawing the eye upward. Premium molding choices give a home an immediate sense of permanence, historic character, and deliberate, thoughtful design that cheap paint simply cannot replicate.
3. What is the difference between MDF and solid wood for interior trim?
Both materials have a distinct time and place in a high-end remodel:
- MDF (Medium-Density Fiberboard): An engineered wood product that is incredibly stable. It doesn’t expand or contract with New England’s humid summers and freezing winters, meaning your paint seams won’t crack. It comes perfectly smooth with no knots, making it the premier choice for painted trim and built-ins.
- Solid Wood (Poplar, Pine, Oak, Walnut): Crucial if you plan to stain or varnish the wood to show off its natural grain. Hardwoods like Poplar are also favored by finish carpenters for painted trim in high-traffic areas (such as baseboards or door casings) because they resist dents and impacts much better than MDF.
4. How do I choose the right scale and profile of molding for my ceiling height?
Scale is everything—scale it poorly, and a room will feel either cramped or completely washed out.
- Standard 8-foot ceilings: Stick to classic 3″ to 4″ crown molding and 4″ to 5″ baseboards. Going too large will visually “drop” the ceiling and make the room feel short.
- 9- to 10-foot ceilings: You have room to play. Look for 5″ to 7″ crown profiles, or consider a “built-up” molding (stacking multiple smaller trim pieces together) paired with an elegant 7″ to 9″ baseboard to anchor the room.
5. What is the difference between Wainscoting, Beadboard, and Shiplap?
These are all forms of wall paneling, but they convey completely different design aesthetics:
- Wainscoting: A classic, formal architectural feature covering the lower portion of a wall, traditionally topped with a chair rail. It features raised or recessed panels that add formal elegance to dining rooms and entryways.
- Beadboard: Vertical wood panels characterized by small, rounded ridges (or “beads”) between planks. It leans traditional, cottage, or farmhouse, and is highly popular in bathrooms and mudrooms.
- Shiplap: Horizontal or vertical planks that overlap with a slight gap (or “reveal”) between them. It delivers a clean, modern-rustic or coastal vibe.
6. Why do the joints in my trim split open in the winter, and how do pros fix it?
Wood is a natural, porous material that breathes. When the winter air gets incredibly dry, wood contracts; when summer humidity hits, it expands. Cheap or rushed carpentry relies entirely on basic caulk to hide gaps, which quickly tears open during these seasonal shifts. Professional finish carpenters prevent this by using tight, mechanical joinery—like coped joints for inside corners (where one piece is meticulously back-cut to nest perfectly over the face of the adjoining piece) rather than basic miter cuts.
7. Can custom millwork help hide awkward structural eyesores?
Yes, this is one of the greatest practical superpowers of finish carpentry. If a home remodel requires dropping a structural steel beam or running bulky HVAC ductwork across a ceiling, a finish carpenter can box those elements in with premium hardwood and wrap them in matching crown molding. This transforms an ugly structural necessity into a beautiful architectural feature, such as a faux-coffered ceiling or a decorative accent header.
8. What are “built-up” moldings, and why are they used in luxury homes?
Instead of buying a single wide piece of trim from a big-box store, custom builders create “built-up” profiles by stacking 2, 3, or even 4 separate, smaller pieces of molding. For example, a carpenter might combine a flat base layer, an elegant cove molding, and a small bead trim along the ceiling. This creates highly complex, deeply layered shadow lines and unique geometric profiles that give a home a completely bespoke, luxury appearance.
9. How do I match new custom trim to the historic character of an older home?
If you are remodeling a historic New England home, standard modern trim profiles will look completely out of place. To preserve your home’s historic integrity, a custom carpenter can remove a small section of your original, undamaged trim and use it as a template. If a matching profile cannot be found commercially, we can work with a specialized mill to cut a custom router knife that replicates the exact historic shape, ensuring the new addition blends seamlessly with the old build.
10. Should trim be painted the same color as the walls, or a contrasting color?
It depends entirely on the design aesthetic you want to achieve:
- Classic & High-Contrast: Paint the millwork a bright, clean semi-gloss white against a muted or colorful matte wall. This emphasizes the crisp geometric lines of the woodwork and makes the architectural details pop.
- Modern & Monochrome (“Color Drenching”): Paint the walls, baseboards, and crown molding the exact same color, but use a semi-gloss or satin finish on the woodwork. This softens the room, blurs the boundaries, and creates a highly sophisticated, contemporary feel.