From Blueprint to Build: How Custom Homes Come to Life
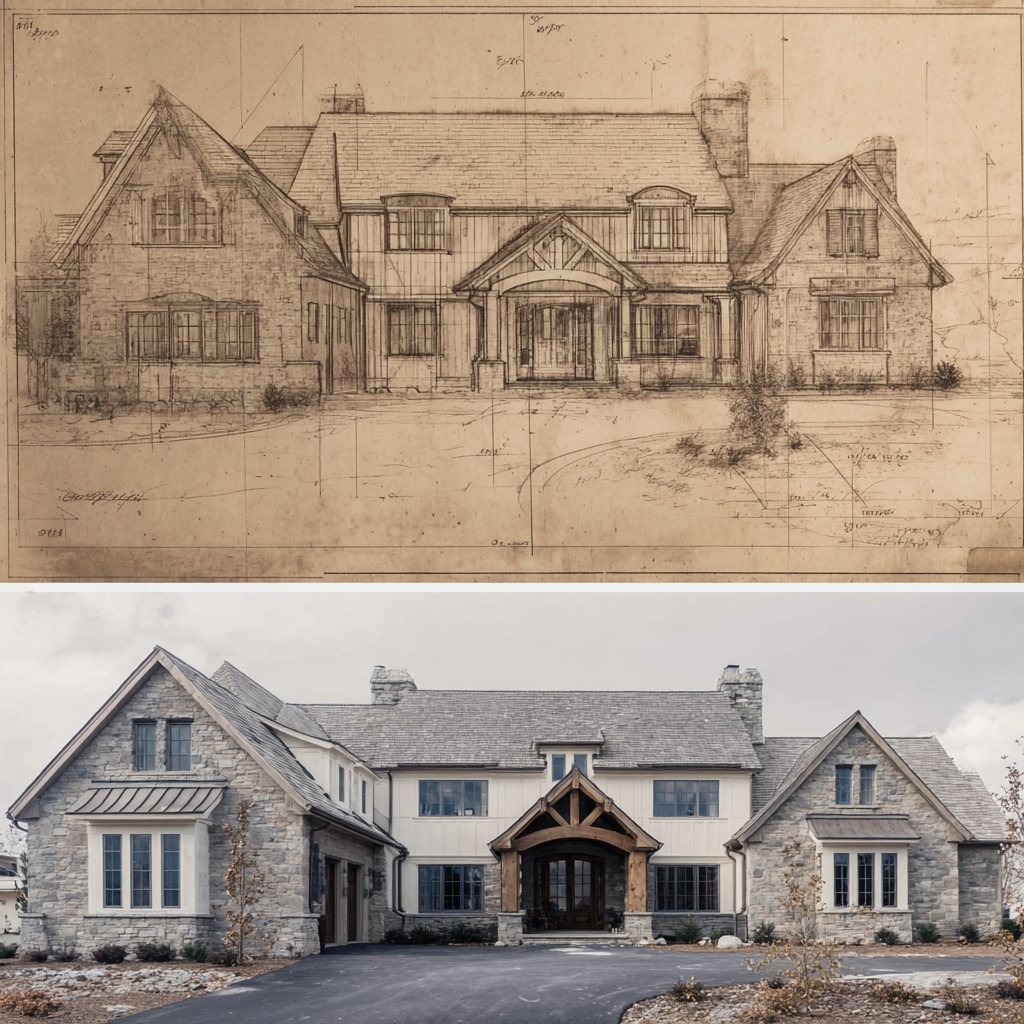
You bring a new custom home to life by turning how you’ll live, work, host, and charge into must-haves, a realistic budget, and a lot check for setbacks, grading, utilities, drainage, solar, and HOA rules. You translate goals into room adjacencies, dimensions, and performance targets, then lock key decisions in plans and specs. You bid identical packages, choose a proven builder, set a clear contract and schedule, and verify each phase with checkpoints, photos, and tests—there’s more ahead.
Custom Home Planning: Budget, Lot, Must-Haves
Where do you start when you’re planning a custom home? You start by defining outcomes, not square footage: how you’ll live, work, host, and recharge. Next, set a realistic budget range and identify budget tradeoffs early—prioritize structural upgrades, performance systems, and flexibility over finishes you can swap later. Then validate your lot: confirm setbacks, grading, utilities, access, drainage, solar orientation, and any HOA rules. These lot constraints shape what’s feasible and where innovation pays off, such as compact footprints with high-efficiency envelopes or smart site staging to reduce excavation. Finally, document must-haves versus nice-to-haves, and lock decision checkpoints. You’ll move faster, reduce change orders, and keep approvals predictable.
Design: Turn Your Wish List Into Plans
How do you turn a page of must-haves and inspiration photos into a buildable set of plans? You start the design process by translating lifestyle goals into adjacencies, dimensions, and performance targets. You’ll review site constraints, sun angles, and views, then iterate fast with sketches, 3D models, and room-by-room flow checks so every square foot earns its keep. As decisions tighten, you’ll lock key moves and document them clearly:
- Space planning that maps daily routines to layouts
- Elevations that balance character with constructability
- Systems-aware details for lighting, storage, and comfort
- Material selection aligned to durability, maintenance, and aesthetics
You’ll finish with coordinated drawings that capture intent, reduce surprises, and keep innovation practical from day one.
Pre-Construction: Builder, Bids, Contract, Schedule
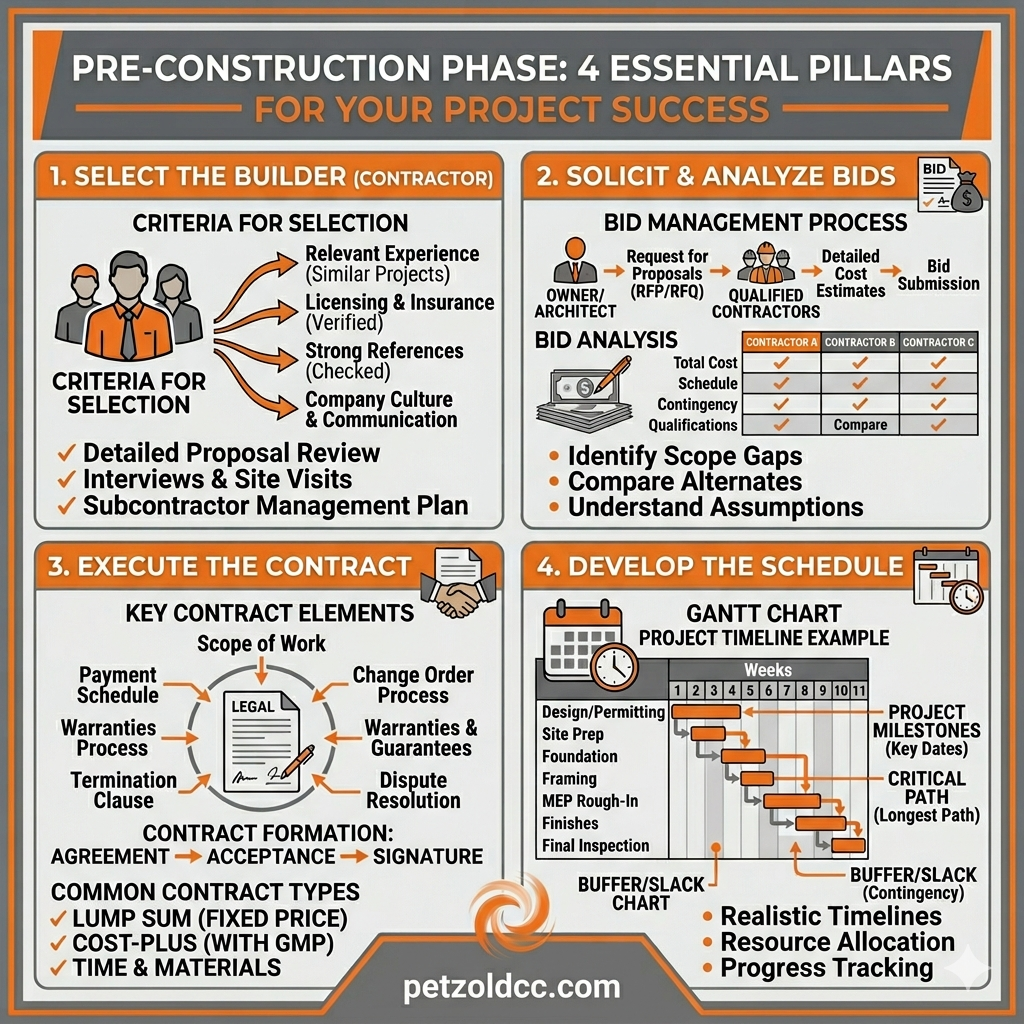
Before a shovel hits the ground, you’ll choose the right builder, collect comparable bids, and turn the “pretty drawings” into a clear scope, price, and timeline. Start with contractor selection: prequalify teams by portfolio fit, safety record, financial stability, and how they manage subs and tech-enabled reporting. Issue a bid package with the same plans, specs, allowances, and alternates to keep pricing apples-to-apples, then review exclusions and clarifications line by line to reduce pre-construction risk. Next, lock a contract that defines the payment schedule, change-order workflow, insurance, warranties, and dispute resolution. Finally, build a schedule tied to long-lead selections, permitting milestones, and decision deadlines, so you can track progress with transparent, data-driven checkpoints before mobilization.
Custom Home Construction Phases: Foundation to Finishes
Once permits clear and your schedule’s locked, the project shifts from planning to a repeatable sequence of field phases you can track and verify: site work and excavation, foundations and waterproofing, framing and dry-in (roofing, windows, exterior sheathing), rough-ins for mechanical/electrical/plumbing, insulation and drywall, then interior and exterior finishes through final trim, paint, flooring, fixtures, and commissioning. You’ll stay in control by tying each phase to measurable checkpoints, documented photos, and tested systems. Your builder should share foundation insights (soil, rebar placement, curing, drainage) and confirm materials sourcing before installs to avoid substitutions and delays. Expect a tight cadence: scope review, field verification, and sign-offs.
- Surveyed setbacks and utility locates
- Pour-day QA and waterproofing tests
- Framing tolerances and air-seal strategy
- Rough-in scans, then finish mockups
Final Walk-Through: Punch List, Warranty, Move-In
With finishes installed and systems commissioned, you’re ready to verify the home performs—and looks—exactly as specified. During the final walk-through, you’ll follow a room-by-room checklist, test smart controls, confirm HVAC balance, run fixtures, inspect paint and millwork, and validate safety devices. You’ll capture issues in a punch list with photos, locations, and priority tags so your builder can schedule trades, order parts, and close items fast. Before you accept keys, you’ll review closeout docs: as-builts, product manuals, maintenance schedules, and commissioning reports. You’ll also confirm warranty details, including coverage periods, exclusions, and the digital process for submitting service tickets. Once corrections pass recheck, you’ll sign completion, transfer utilities, and move in confidently.
Frequently Asked Questions
How Long Does It Take to Secure Construction Financing and Final Loan Approval?
You’ll typically secure construction financing and final loan approval in 30–60 days, depending on lender capacity and project complexity. Your financing timelines shorten when you submit complete plans, a fixed-price contract, and verified income upfront. During the loan approval process, you’ll move through pre-qualification, appraisal and plan review, underwriting, and closing. If you’re using innovative build methods, expect extra documentation reviews that can add 1–2 weeks.
Do I Need an Architect, or Can I Use Pre-Designed Custom Plans?
Nearly 60% of custom-home cost overruns trace back to design decisions, so you can’t skip smart planning. You don’t always need an architect; you can use pre-designed custom plans if you validate architectural feasibility and zoning compliance early. You’ll still want a licensed professional to adapt the plan to your site, engineering, energy goals, and permitting pathway. You’ll reduce rework by running plan reviews, code checks, and consultant coordination.
What Smart-Home Systems Should Be Planned Before Walls Are Closed?
Before walls close, you should plan Smart home wiring for structured cabling, Wi‑Fi access points, PoE cameras, doorbell, and intercom. You’ll also want dedicated circuits, low-voltage conduits, and centralized equipment space with cooling. Specify Lighting control now: switch box depths, keypad locations, dimmer compatibility, and fixture grouping. Prewire for motorized shades, whole-home audio, HVAC zoning, sensors, and future expansion, then document runs and labels for commissioning.
How Are Property Taxes Reassessed After Building a New Custom Home?
After you build a new custom home, your county typically reassesses property taxes once the permit closes, a certificate of occupancy issues, or during the next assessment cycle—Exploring tax reassessment timing helps you budget. You’ll file final construction costs, and an appraiser may inspect. Understanding assessors’ methods matters: they value land plus improvements using cost, comparable sales, and income models, then apply exemptions. You should ask for the notice, review data, and appeal quickly.
What Happens if I Want to Add an Addition Years After Completion?
You can add an addition years later, but you’ll treat it like grafting a new branch onto a mature tree. Start with additions planning: confirm zoning, setbacks, HOA rules, and structural capacity, then hire an architect/engineer to tie new loads into existing systems. Next, run a budget impact analysis covering design, permits, construction, utilities upgrades, and contingencies. You’ll pull permits, schedule inspections, and expect a property tax reassessment.
Conclusion
You’ve seen how a custom home moves from budget and lot selection to plans, bids, and a clear schedule, then through foundation, framing, systems, and finishes. Worried you’ll miss something? You won’t if you stick to the process: document decisions, approve selections on time, and walk the site with your builder at key milestones. At the final walk-through, you’ll confirm every punch list item, understand your warranty, and move in with confidence.