Small Bathroom, Big Impact: Smart Layouts for Boston-Area Historic Homes
In a Boston-area historic home, you’ll get the biggest small-bath upgrade by designing around the existing stack, vents, and joist bays instead of fighting them. Keep supply and waste runs tight to the riser so you don’t drop the plaster ceiling below. Tuck the toilet behind a short privacy wall, choose a slim console or wall-hung sink, and run a straight wet wall to a glass-panel shower. Add a pocket or swing-clear door, then built-ins that match your trim—there’s more ahead.
Plan a Small Bathroom Layout Around Existing Plumbing
Where do you start when a Beacon Hill or Cambridge bath is barely wider than its original door casing? You begin by mapping the stack, venting, and joist bays, and then you treat planning constraints as design inputs rather than roadblocks. Prioritize plumbing compatibility by keeping supply and waste runs tight to existing risers, so you don’t sacrifice historic plaster ceilings below. From there, push layout optimization with millwork that hugs pipe chases, and improve door swing efficiency with a pocket or outswing where code allows. Plan storage integration in recessed cabinets between studs, trimmed to match old casings. Choose lighting and finishes that brighten narrow rooms—opal globes, warm LEDs, matte tile—and specify period-appropriate hardware in unlacquered brass or nickel.
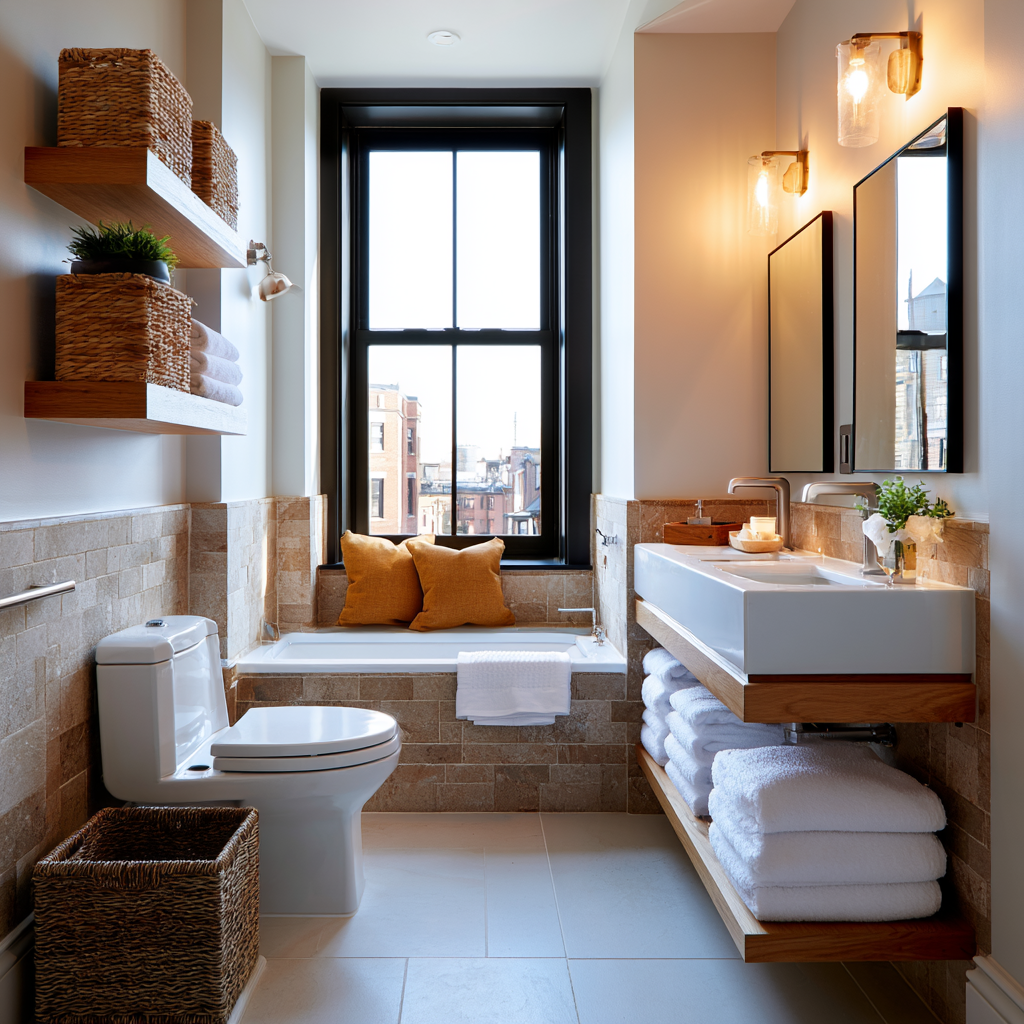
Place Toilet, Sink, and Shower for Better Flow
How you place the toilet, sink, and shower determines whether a tight Beacon Hill or Cambridge bath feels like a corridor or a calm, usable room. Start with toilet placement: tuck it behind a short privacy wall or at the far end so sightlines stay open from the threshold, a common trick in narrow rowhouse plans. Keep code clearances tight but comfortable, and align the bowl with joist bays to minimize structural surprises. For sink placement, favor a slim console or wall-hung basin that nods to early-20th-century baths yet frees floor area for circulation. Put the shower where you can run a straight, compact wet wall; a glass panel keeps light moving across original plaster and trim. Ensure towel access too.
Use Pocket or Swing-Clear Doors to Save Space
In a Boston-area historic bath, even the door swing can steal the one clear spot you need to dress, towel off, or open a vanity. When you’re working with a narrow Back Bay alcove or a Cambridge triple-decker, reclaiming that arc changes everything.
If the wall cavity allows, pocket doors slide neatly out of sight and keep circulation clear, especially beside a pedestal sink or tub apron. In plaster-and-lath houses, you’ll want careful framing and sound control to keep the door from rattling. When a pocket isn’t practical, swing clear doors (also called offset-hinge doors) pivot so the panel clears the opening and lays flatter to the wall, gaining precious inches without moving trim. Specify period-appropriate casings and modern hardware finishes for a seamless upgrade.
Add Built-In Storage That Works With Historic Trim
Once you’ve freed up floor area with a pocket or swing-clear door, you can put those reclaimed inches to work by building storage into the architecture instead of stacking furniture in the corners. In Boston’s Victorian and Colonial baths, Built in storage should read like it’s always been there: align new casework with existing baseboards, reuse backband profiles, and stop short of ornate window casings. Go Historic trim friendly by scribing panels to wavy plaster, keeping reveals consistent, and painting to match old-growth millwork. Recess medicine cabinets between studs, add toe-kick drawers under a console, and tuck linen cubbies into chimney alcoves without touching the mantel mass.
- Relief when counters finally clear
- Pride as trim lines stay uninterrupted
- Calm from everything having a home
- Nostalgia when details feel original
- Confidence your upgrade won’t look “new”
Refresh Lighting, Tile, and Hardware: Keep Period Charm
Where do you get the biggest visual lift in a Boston historic bath without disturbing its bones? You refresh lighting, tile; hardware in ways that read original, not staged. Swap a tired vanity bar for an opal-glass schoolhouse or a compact prismatic sconce, and add a dimmer that disappears in a period-style toggle.
For tile, keep the era’s geometry: 1″ hex on the floor, subway on the walls, or a restrained mosaic border. Choose matte whites, soft celadon, or charcoal accents that echo Beacon Hill stoops and Cambridge slate roofs. Repair plaster, then run tile to the same historic height.
Finish with unlacquered brass, nickel, or blackened iron hardware, plus a high-arc gooseneck faucet. You’ll preserve period charm while upgrading performance.
Frequently Asked Questions
How Long Does a Historic Small-Bath Remodel Typically Take in Boston?
You’ll typically spend 6–12 weeks on a historic small-bath remodel in Boston, with simpler refreshes nearer 4–6. Historic timing stretches when you uncover knob-and-tube wiring, lead lines, or lath-and-plaster repairs, or when you need landmark approvals. Contractor logistics matter: tight Back Bay stairwells, parking permits, and staged debris removal slow progress. You’ll move faster with prefabricated panels, scanned layouts, and early fixture ordering.
Do I Need Permits for a Small Bathroom Renovation in a Landmark District?
Yes—you’ll usually need permits, and you may also need landmark approval before you pull them. If you touch plumbing, electrical, ventilation, or move walls, Boston’s ISD requires permits; even “like-for-like” swaps can trigger permitting nuances. In a landmark district, Historic compliance adds an extra review for visible fixtures, windows, or exterior venting. Coordinate early with the local commission and your licensed trades to avoid delays.
What Is the Typical Budget Range for Updating a Small Historic Bathroom?
You’ll typically budget **$12,000–$35,000** to update a small historic bathroom, with premium, preservation-minded work reaching **$45,000+**. For tight **budget planning**, keep plumbing locations, specify period-correct tile, and prioritize ventilation upgrades. **Materials sourcing** drives swings: salvaged hex mosaic, unlacquered brass, and custom millwork cost more but read authentic. You can innovate with radiant floors, low-profile curbless showers, and smart humidity sensing without compromising character.
How Can I Improve Ventilation Without Altering the Home’s Exterior?
You can improve ventilation without exterior changes by installing a high-sone, low-noise inline fan that exhausts through an existing roof vent or masonry flue, preserving your façade. For Ventilation upgrades, add a humidity-sensing switch, seal gaps around plaster, and use a backdraft damper. Try Exterior free methods like a transom-style interior louver, upgraded door undercut, and a quiet dehumidifier tuned for Boston’s damp seasons.
How Do I Handle Lead Paint or Asbestos During a Bathroom Renovation?
You handle lead paint by testing first, then hiring an EPA RRP-certified renovator to contain dust with plastic, HEPA vacuums, and wet methods—don’t sand dry. For asbestos safety, you don’t disturb suspect tile, mastic, pipe wrap, or plaster until a licensed inspector samples it; if positive, you use certified abatement with negative air and sealed disposal. You document everything for permits and future buyers.
Conclusion
In your Boston-area historic home, you let the old pipes set the rhythm, like the hidden beams that still hold the house straight. You place the toilet, sink, and shower so movement feels like a clean hallway, not a squeeze. You choose a pocket door that vanishes like a well-kept secret. Built-ins tuck proud trim beneath. Then you swap in warm sconces, classic tile, and solid brass—small choices that ring like church bells.